Today I strained the peach, pear and raspberry vinegars and started 2 jars of mango and 1 jar of cranberry (so far). To the mango I added sugar water and to the cranberry I added the last of my vodka. The mothers were from the freshly emptied jars.
The peach and the pear made a pint of vinegar each, but the raspberry made almost 3 cups. (It's mother was far thinner, so I'm guessing had a far less voracious appetite.) With the extra cup I'm making a full batch of sekanjabin with sugar and mint.
A side note: My kombucha failed; I found it day before yesterday. I'm guessing I let the mother dry out as it grew green mold on it. I fully expected the drink beneath to be putrid, but surprisingly it wasn't.
Tuesday, April 22, 2014

Thursday, April 3, 2014
Time to Make the Vinegars
Some of my vinegars are finally moving on to the next step. The mother from the peach vinegar went into the batch of honey 'vinegar' that is still where it started and the peach went back into the closet until I can get a plastic strainer.
The mother from the chocolate vinegar went into a new batch of soon-to-be-kombucha I made today. The chocolate vinegar went back into the closet to re-settle the chocolate out of the vinegar so it can be poured into another jar.
The pie cherry vinegar has 2 mothers in it. 1 will be going into 3 cups of Arbor Mist Blackberry wine once it warms up enough, but I think I'll leave the thinner mother in with the cherries until I get the plastic strainer.
To stabilize their acid levels once the 3 are strained and in new jars I'll be waterbathing them until the reach and sustain 140 degrees for 10 minutes.
The mother from the chocolate vinegar went into a new batch of soon-to-be-kombucha I made today. The chocolate vinegar went back into the closet to re-settle the chocolate out of the vinegar so it can be poured into another jar.
The pie cherry vinegar has 2 mothers in it. 1 will be going into 3 cups of Arbor Mist Blackberry wine once it warms up enough, but I think I'll leave the thinner mother in with the cherries until I get the plastic strainer.
To stabilize their acid levels once the 3 are strained and in new jars I'll be waterbathing them until the reach and sustain 140 degrees for 10 minutes.
Friday, March 28, 2014
More Supplies for My Tent
Now that I have all the walls and corners made for my 10'x10' frame the work begins on the 2 additional panels each for the wall and corners, plus the 2 gable sections needed by my 10'x20' carport frame.
I've decided to put windows in the 2 new wall panels and in the 2 gable sections which means the 1/4 roll of twill tape I have left won't be enough. So I placed another order with Wm Booth, Draper, for another 100' roll of tape. While that will be far too much for the remaining sections it was $1/ft cheaper to order 100' and it won't hurt to have it it on hand for whatever. (Door ties immediately come to mind.)
I also picked up 3 more rolls of upholstery thread at JoAnn's.
$28 - 100' roll of 1" wide cotton twill tape
$8 - Shipping
$8.37 - Upholstery Thread x 3
$0.69 - Tax
$45.06 - Total
I've decided to put windows in the 2 new wall panels and in the 2 gable sections which means the 1/4 roll of twill tape I have left won't be enough. So I placed another order with Wm Booth, Draper, for another 100' roll of tape. While that will be far too much for the remaining sections it was $1/ft cheaper to order 100' and it won't hurt to have it it on hand for whatever. (Door ties immediately come to mind.)
I also picked up 3 more rolls of upholstery thread at JoAnn's.
$28 - 100' roll of 1" wide cotton twill tape
$8 - Shipping
$8.37 - Upholstery Thread x 3
$0.69 - Tax
$45.06 - Total
Monday, March 24, 2014
My February Vinegars
Gulf Wars came and went, but my 'vinegars' stayed at home. Lesson learned. Apparently months are needed to brew vinegars in winter.
Good news came this afternoon when I was in my big closet getting supplies and I saw mothers formed on at least 5 of the solutions. The thickest are on the peach (below), pie cherry and chocolate.
 The maraschino cherry and pear each have a thin layer; the raspberry and honey appear to have none. The raspberry is in a regular neck mason jar and filled almost to the top so I have to wonder if it's getting enough air. I can't remember if I added any vodka to the honey mixture (another lesson learned - NOTES!), but I can't believe I didn't. I wonder if the anti-bacterial properties of the honey are at play......
Tomorrow I'll check the pH in the 3 with the thickest mother to see if they're ready to stabilize. Fingers crossed!
Good news came this afternoon when I was in my big closet getting supplies and I saw mothers formed on at least 5 of the solutions. The thickest are on the peach (below), pie cherry and chocolate.
Tomorrow I'll check the pH in the 3 with the thickest mother to see if they're ready to stabilize. Fingers crossed!
Friday, February 28, 2014
Cool Weather and Vinegar Brewing
We've been hit with an extended patch of unseasonably cold weather and with my side board being against the north wall of my house it just isn't staying warm enough for my vinegars to brew, even with me stirring them nightly in an effort to keep the oxygen levels high. Tonight I've moved all the jars into my big hall closet close to the water heater hoping that it will keep the ambient air temperature warm enough to get the vinegar bacteria growing.
Tuesday, February 18, 2014
Making Vinegars to Use in Sekanjabin
A few weeks ago I started soaking fruits in vodka in order to make cordials so I can use them to make vinegar to use in making Sekanjabin.
A few days ago I strained the raspberries, pie cherries, peaches and pears out of the vodka. The vodka had sugar-laden water mixed into it to make cordials; I put the fruit into another jar, added sugar-ladened water, a couple teaspoons of vinegar containing mother, as well as a piece of mother I had in the side board. Today the maraschino cherries and the 80% chocolate have been taken out of the vodka, given the same treatment and into the side board they've gone with the others.
In an effort to speed up my other mixtures I've added some of their cordials to each of them. Good thing I didn't do it as I originally thought I should. I had used pure 80% alcohol vodka and, come to find out, the highest alcohol content you can have without slowing down fermentation is 10%.
A few days ago I strained the raspberries, pie cherries, peaches and pears out of the vodka. The vodka had sugar-laden water mixed into it to make cordials; I put the fruit into another jar, added sugar-ladened water, a couple teaspoons of vinegar containing mother, as well as a piece of mother I had in the side board. Today the maraschino cherries and the 80% chocolate have been taken out of the vodka, given the same treatment and into the side board they've gone with the others.
In an effort to speed up my other mixtures I've added some of their cordials to each of them. Good thing I didn't do it as I originally thought I should. I had used pure 80% alcohol vodka and, come to find out, the highest alcohol content you can have without slowing down fermentation is 10%.
Sunday, October 27, 2013

The necklace is based on a Byzantine necklace, dated C.E. 500-700, found in Cyprus. To make I had to cut short pieces of wire, make a loop, wrap the end around the 'stem', thread on a bead/pearl, make another loop, etc. Making an end that has nothing hanging from it is a LOT easier than making them while trying to balance an additional loop in the mix.
Thank you, HL Avelyn Blakenye, for sharing your knowledge and talent with the rest of us!
Tuesday, October 1, 2013
The Making of My New Tent - The 'Front Door'
I've been kicking around ideas about how to close the 'door' of my tent ever since I decided to go with the wattle and daub design. A zipper makes a lot of noise and would definitely distract from the image of opening the door of a house. Tying and untying straps didn't feel right either.
Someone had suggested using magnets as closures, but after pricing earth magnets I decided that was too cost prohibitive, but the overall concept of using them stuck with me. Then the other day it finally hit me - velcro. While it will give a modern sound when being opened the act of opening the door will be fairly fluid, much like opening a regular door. Closing it will take a moment to line the flaps up properly, but I think will work well. For a safety factor at night I will be including ties on the interior flaps so I can tie my door shut at night.
The over all design is a flap on the outside of approx. 4.25" width (the opening side door jamb) with a 2.5" wide privacy flap behind it where the loop Velcro will reside. On the backside of the outside edge of the other side of the 'door' I'll sew on the hook part of the Velcro.
To open the door you will have to reach behind the 4.25" flap, grab the edge of the 'door' and give a pull. Easy peasy.
When closed the baffling will give excellent privacy and should give very good protection against wind getting in or opening the 'door'.
Someone had suggested using magnets as closures, but after pricing earth magnets I decided that was too cost prohibitive, but the overall concept of using them stuck with me. Then the other day it finally hit me - velcro. While it will give a modern sound when being opened the act of opening the door will be fairly fluid, much like opening a regular door. Closing it will take a moment to line the flaps up properly, but I think will work well. For a safety factor at night I will be including ties on the interior flaps so I can tie my door shut at night.
The over all design is a flap on the outside of approx. 4.25" width (the opening side door jamb) with a 2.5" wide privacy flap behind it where the loop Velcro will reside. On the backside of the outside edge of the other side of the 'door' I'll sew on the hook part of the Velcro.
To open the door you will have to reach behind the 4.25" flap, grab the edge of the 'door' and give a pull. Easy peasy.
When closed the baffling will give excellent privacy and should give very good protection against wind getting in or opening the 'door'.
Saturday, April 7, 2012
The Making of My New Tent - More Canvas
I ordered another 12' x 15' tarp ($35.79 + $16.82 S&H) and had to make another trip to the laundromat ($4.50 - washer; dried outside).
Tuesday, February 14, 2012
The Making of My New Tent - What Was 'Building a Regency Pavillion'
When I originally decided to build my tent I had designed a regency pavilion. (See drawings below.) But after gathering all my supplies and getting down to the actual cutting of canvas I just couldn't make the cut of the corner gores. Seriously.
I went home that night after A&S and started giving considerable thought to why I was having trouble with making that particular cut in the fabric. After several days of rolling it over in my mind I realized that the problem lay with the fact that my persona would not have traveled with a tent. Were they to go on a pilgrimage, etc. they would have stayed in inns.
With that thought in mind the changes that ensued came quickly and amazingly easily. The new design is now a wattle & daub house. After conferring with a former shire mate with amazing artistic talents I will be painting, using a 1:1 mixture of exterior latex paint:water, large timbers on the house. My artist friend will come in with a lighter color brown and paint in highlights. She will also be painting the roof to appear to be made of thatch.
This design feels absolutely perfect!
I went home that night after A&S and started giving considerable thought to why I was having trouble with making that particular cut in the fabric. After several days of rolling it over in my mind I realized that the problem lay with the fact that my persona would not have traveled with a tent. Were they to go on a pilgrimage, etc. they would have stayed in inns.
With that thought in mind the changes that ensued came quickly and amazingly easily. The new design is now a wattle & daub house. After conferring with a former shire mate with amazing artistic talents I will be painting, using a 1:1 mixture of exterior latex paint:water, large timbers on the house. My artist friend will come in with a lighter color brown and paint in highlights. She will also be painting the roof to appear to be made of thatch.
This design feels absolutely perfect!
 |
 |
 |
 |
Friday, November 11, 2011
The Making of My New Tent - Sewer's Aid
As I'm following the website, 'Max & Mickel's Easy, No-bake Pavilion' on making my tent. As per his post "Lubricate the needle of your sewing machine before each seam " I purchased 3 bottles of Sewers Aid (@ $4.55). With $6.95 shipping, the total was $20.60. Well worth the money if it keeps me from breaking needles!
_______________________________
Post Script: One (1) bottle was more than enough Sewers Aid! I have 4 walls made, have yet to break or even dull a needle and have almost all of the first bottle of Sewers Aid left.
_______________________________
Post Script: One (1) bottle was more than enough Sewers Aid! I have 4 walls made, have yet to break or even dull a needle and have almost all of the first bottle of Sewers Aid left.
Wednesday, September 28, 2011
The Making of My New Tent - Thread, Velcro & Waterproofing
Got my upholstery thread, heavy duty sewing machine needles and Velcro today while at Jo Ann's.
For thread I got 3 spools (150 yds each) of darker khaki for the canvas and 2 spools of off white to stitch on the twill tape. I also picked up Vecro for the top of the tent wall corners and lower edges of the roof corners so they can attach to the easy up's frame. The original roof has Velcro and it should work well for keeping my canvas on my frame.
This evening I was reading emails from 1 of the Yahoo SCA encampment groups and there was talk about waterproofing tents. Someone posted a link for NikWax and after checking out their site I decided to purchase 2 - 500 ml bottles of Nikwax Tent and Gear Solar Proof instead of the waterproofing stuff at Academy. My thought was, considering the price, the extra solarproofing was worth the extra money. Hopefully while it's making my tent last longer it's also keeping the rays out of my tent, thus keeping it cooler.
5 spools of thread @ 2.49 11.98
1 yd ex wide Velcro 10.58
Sewing machine needles 5.28
1,000 ml Nikwax 28.93
_______________________________
Post Script: The Nikwax was a complete waste of money. It was of absolutely no value.
For thread I got 3 spools (150 yds each) of darker khaki for the canvas and 2 spools of off white to stitch on the twill tape. I also picked up Vecro for the top of the tent wall corners and lower edges of the roof corners so they can attach to the easy up's frame. The original roof has Velcro and it should work well for keeping my canvas on my frame.
This evening I was reading emails from 1 of the Yahoo SCA encampment groups and there was talk about waterproofing tents. Someone posted a link for NikWax and after checking out their site I decided to purchase 2 - 500 ml bottles of Nikwax Tent and Gear Solar Proof instead of the waterproofing stuff at Academy. My thought was, considering the price, the extra solarproofing was worth the extra money. Hopefully while it's making my tent last longer it's also keeping the rays out of my tent, thus keeping it cooler.
5 spools of thread @ 2.49 11.98
1 yd ex wide Velcro 10.58
Sewing machine needles 5.28
1,000 ml Nikwax 28.93
_______________________________
Post Script: The Nikwax was a complete waste of money. It was of absolutely no value.
Monday, September 19, 2011
The Making of My New Tent - Twill Tape
I ordered 100 yards of 1" twill tape tonight from Wm Booth, Draper. I will be running 2 rows down the length of each wall section. The placement of each will from the grommets at the top where the walls attach to the frame down and through a corresponding stake loop at the bottom of each 10' wall section.
Once the 'load tapes' are in place, I will use the remaining tape to bind my hem edges.
100 yds 1" twill tape $38
Once the 'load tapes' are in place, I will use the remaining tape to bind my hem edges.
100 yds 1" twill tape $38
Tuesday, September 13, 2011
Thursday, September 8, 2011
The Making of My New Tent - Canvas Fabric
After buying a canvas drop cloth at Lowe's to use for banners, etc, I got to thinking about using them for my tent fabric. They're canvas and you can get 10 oz weights.
I was familiar with the brand Trimaco, so I called MyTarps.com, asked what brand drop cloths they sold and was told Trimaco. What I failed to realize at the time was that Trimaco uses at least 2 different types of canvas for their drop cloths. While the "SuperTuff premium contractor grade" drop cloths I purchased will work beautifully, I really wish I had known about their "quality heavyweight" Frama line. The canvas I purchased (sight unseen) is a coarser weave, while the Frama cloths are made from "tightly woven twills, sateens, drills and ducks".
Lesson learned.
4 - 12' x 15' 10 oz. drop cloths $138.88
Shipping & Handling $ 28.91
I was familiar with the brand Trimaco, so I called MyTarps.com, asked what brand drop cloths they sold and was told Trimaco. What I failed to realize at the time was that Trimaco uses at least 2 different types of canvas for their drop cloths. While the "SuperTuff premium contractor grade" drop cloths I purchased will work beautifully, I really wish I had known about their "quality heavyweight" Frama line. The canvas I purchased (sight unseen) is a coarser weave, while the Frama cloths are made from "tightly woven twills, sateens, drills and ducks".
Lesson learned.
4 - 12' x 15' 10 oz. drop cloths $138.88
Shipping & Handling $ 28.91
Monday, May 9, 2011
My Device
It appears that my device, which I submitted while at Gulf Wars this year, has passed through all the hurtles.

I'm grinning from ear to ear.
Although I know in medieval times devices were generally just given to someone, without their input and generally without much meaning, I chose the elements of mine to convey two separate, but very distinct meanings.
With my vocation being that of a grazier, I wanted my device to read similar to that of signs seen hanging in front of businesses of the time. Thus, the background stands for the fields where the livestock graze, the blue the stream from which they drink, the shock of wheat the grain grown for livestock feed (as well as human food) and the lamb for the livestock.
As a Christian my device takes on a very different meaning. The green represents the everlasting (like the evergreen at Christmas time), the blue stream a 'river of living water', wheat the 'bread of life' and, of course, the lamb 'the Lamb of God, Jesus Christ'.

I'm grinning from ear to ear.
Although I know in medieval times devices were generally just given to someone, without their input and generally without much meaning, I chose the elements of mine to convey two separate, but very distinct meanings.
With my vocation being that of a grazier, I wanted my device to read similar to that of signs seen hanging in front of businesses of the time. Thus, the background stands for the fields where the livestock graze, the blue the stream from which they drink, the shock of wheat the grain grown for livestock feed (as well as human food) and the lamb for the livestock.
As a Christian my device takes on a very different meaning. The green represents the everlasting (like the evergreen at Christmas time), the blue stream a 'river of living water', wheat the 'bread of life' and, of course, the lamb 'the Lamb of God, Jesus Christ'.
Friday, March 11, 2011
My Close Stool
 |  |  |
 |  |  |
The design for my camping close stool was inspired by this chair.
The insert is a 5 gal bucket. A matching 5 gal bucket will hold the peat moss used for the humanure composting.
Saturday, February 19, 2011
My Homemade Inkle Loom
After extensively searching the 'Net for information about inkle looms I finally came up with a drawing that I felt would meet my wants and needs. One of those needs was to able to produce 4 continuous yards of trim.

Our prototype is built from scrap oak that was left over from a set of book shelves my husband built last year. After using my loom for several projects and getting feedback from a master weaver, it was decided that the tensioner should be made from a much larger dowel, the two uppermost dowels should be at least half again as large and the uprights should be double the thickness they are now as the back one is twisting when tension is put on its top dowel.

Our prototype is built from scrap oak that was left over from a set of book shelves my husband built last year. After using my loom for several projects and getting feedback from a master weaver, it was decided that the tensioner should be made from a much larger dowel, the two uppermost dowels should be at least half again as large and the uprights should be double the thickness they are now as the back one is twisting when tension is put on its top dowel.
Tuesday, December 7, 2010
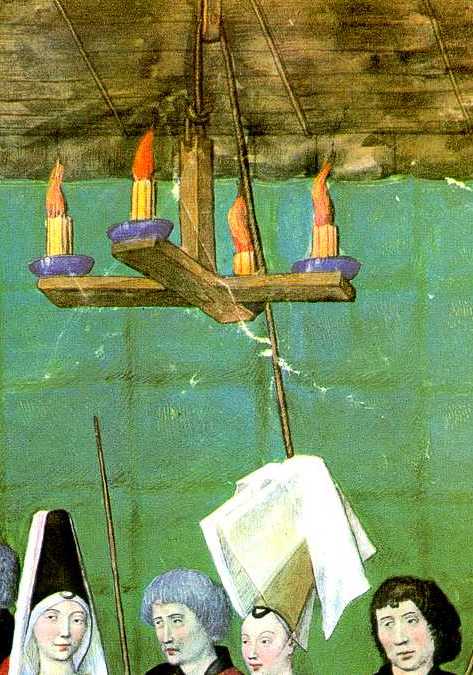
Lighting In My Tent
 | ||
| 1 of a pair of chandeliers my husband and I built based on this painting | Video showing the battery operated candles in action |
Monday, November 22, 2010


Subscribe to:
Posts (Atom)